背景
目前国内使用 Rust 的越来越多,而在使用的时候有时我们经常会遇到依赖包无法下载或下载很慢的情况,所以我们非常需要一个高可靠的国内 Rust 的镜像服务来提高 Rust 包的安装速度。
先来分析下 Rust 依赖安装慢的原因,我们都知道 Rust 依赖安装主要分为两个步骤:
- 依赖包索引更新, Rust 依赖包索引托管在 GitHub,仓库地址为 https://github.com/rust-lang/crates.io-index。
- 依赖包下载, Rust 的依赖包资源统一下载地址为 https://crates.io/api/v1/crates, 通过
dig crates.io可以发现其服务器全部托管在国外。
以上两点原因,大大影响了 Rust 依赖安装的速度,故在搭建 Rust 镜像的时候就要把这两个服务放到国内来。
搭建思路
解决索引托管的问题
使用京东云的云主机自己搭建 crates.io-index 的 git 服务器。这里说下为什么不使用国内已有的 git 托管服务商,原因如下:
- 国内的 git 托管服务都不支持 GitHub 仓库的镜像服务,无法做到项目自动更新,所以还是需要额外的服务器来完成同步工作。
- 无法自定义 git 项目地址和域名,比如 git://rust-mirror.jdcloud.com。
解决依赖包下载的问题
这里使用京东云对象存储的镜像回源功能很容易解决这个问题:
- 对象存储提供永久性存储,防止内容丢失,还提供 https 安全访问。
- 对象存储的镜像回源功能可以很简单的实现资源包从
https://crates.io/api/v1/crates的抓取,抓取的内容还能自动进行签名校验,保证数据的准确性。
动手搭建
第一步: 创建并配置对象存储空间
因为需要在 crates.io-index 的 config.json 中配置新的 dl 地址(对象存储 Bucket 公网访问地址),所以我们先来申请和配置对象存储。
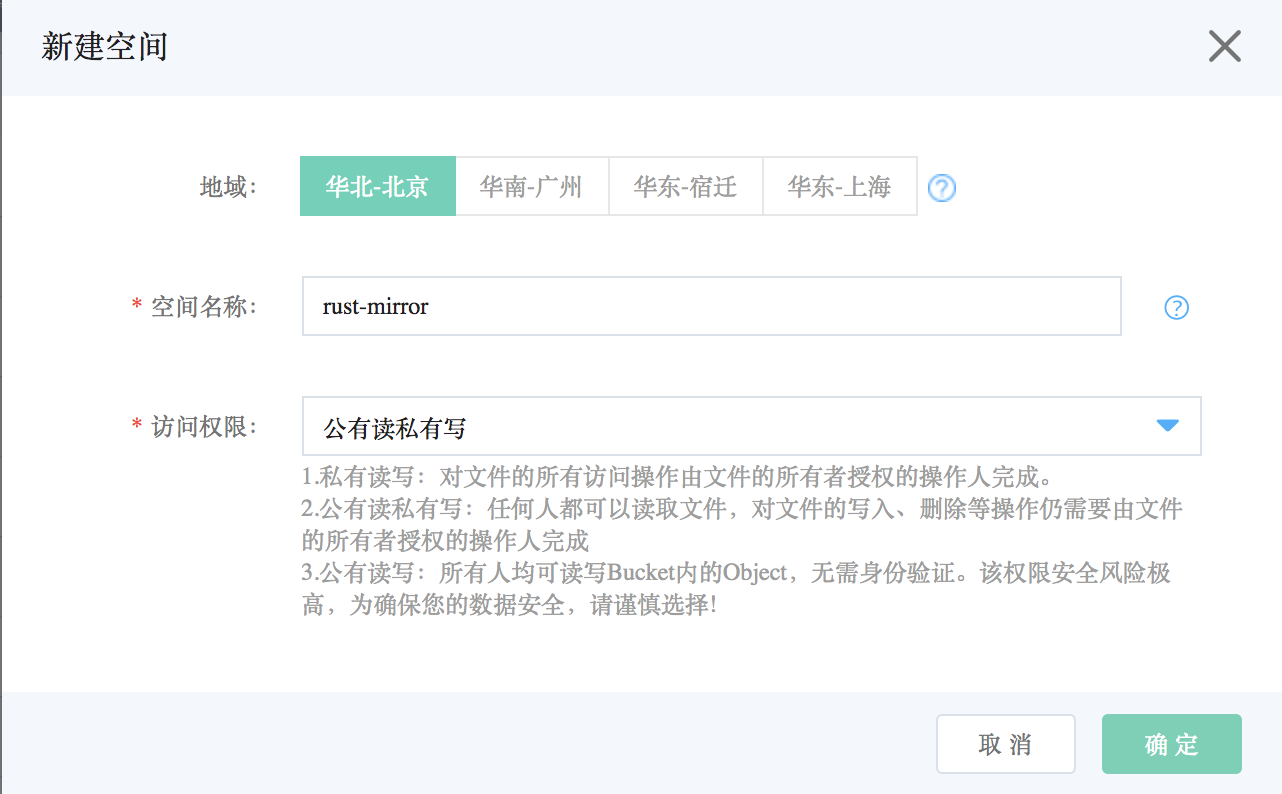
- 创建存储空间
进入京东云的控制台,选择 “存储” -> “对象存储” -> “空间管理” -> “华北-北京” -> “新建空间”,填写空间基本信息(这里的空间名称为 “rust-mirror”):
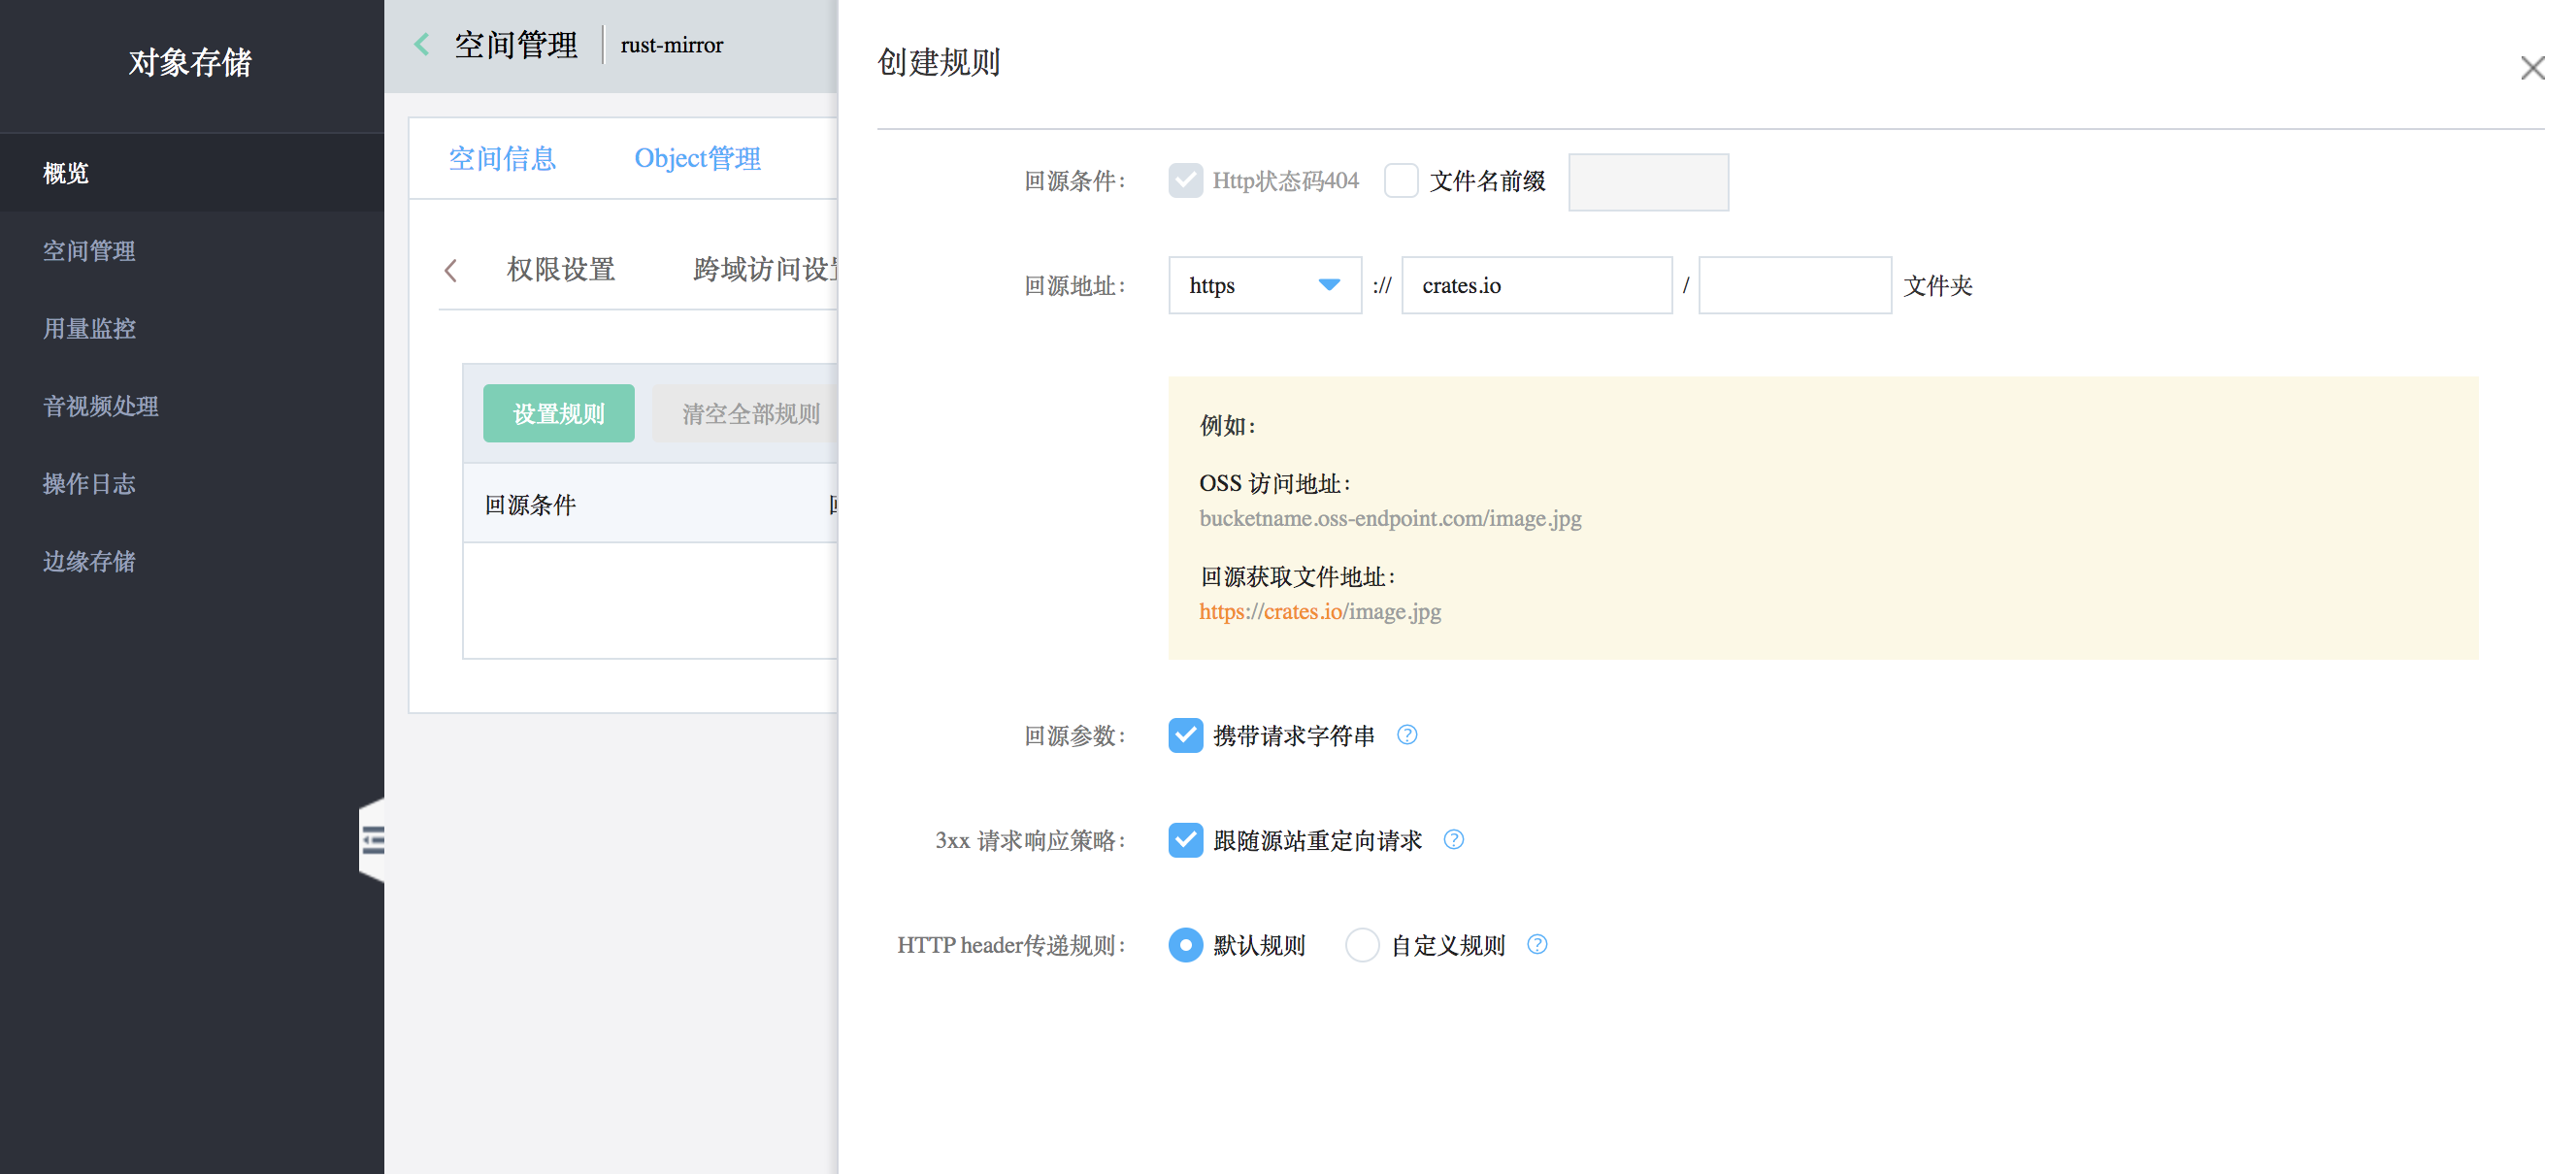
- 配置镜像回源:
选择 “对象存储” -> “空间管理” -> “rust-mirror” -> “空间设置” -> “镜像回源” -> “设置规则”,填写信息如下:
点击保存设置后,可以在配置规则列表看到刚配置的规则信息:
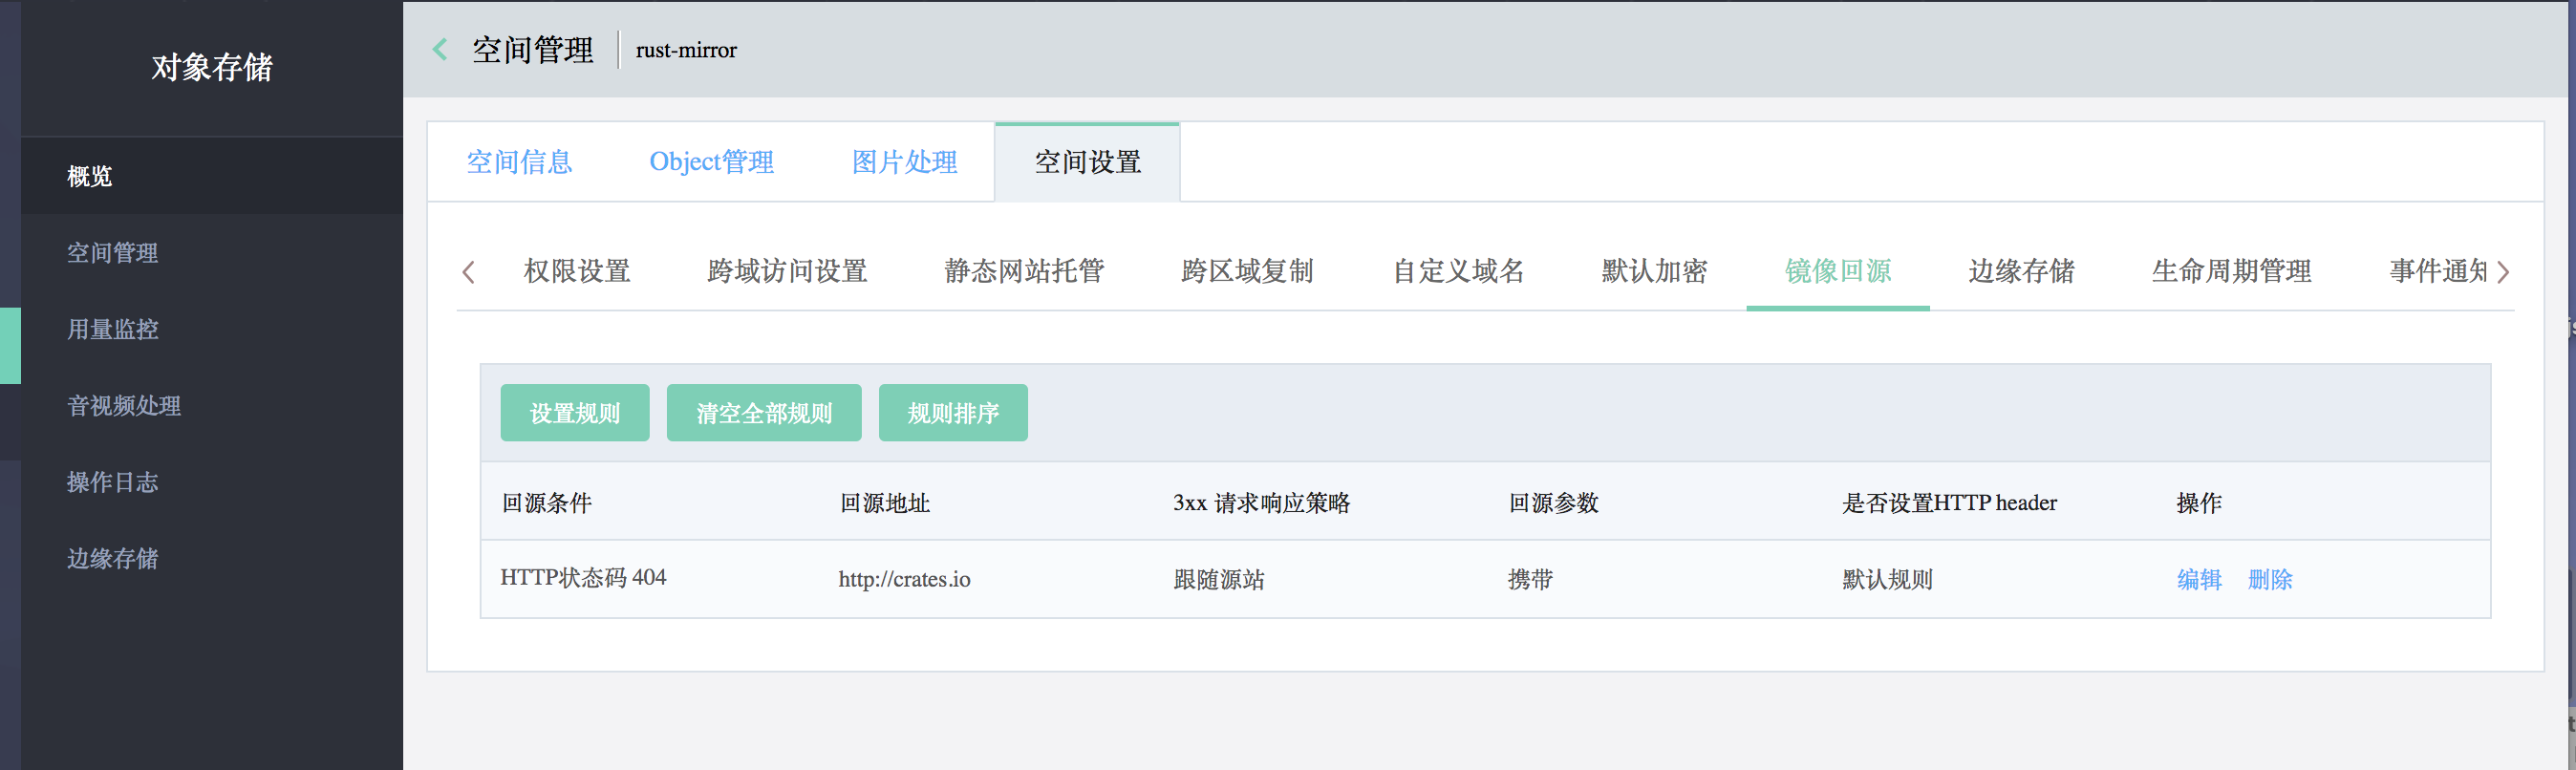
到目前为止,我们已经创建好了一个对象存储的空间,取名叫 “rust-mirror”,并为它配置了 https://crates.io 的镜像规则,接下来我们就可以使该空间的下载域名 rust-mirror.s3.cn-north-1.jdcloud-oss.com 来下载 Rust 的安装包了。
第二步: 搭建 crates.io-index git 同步服务器
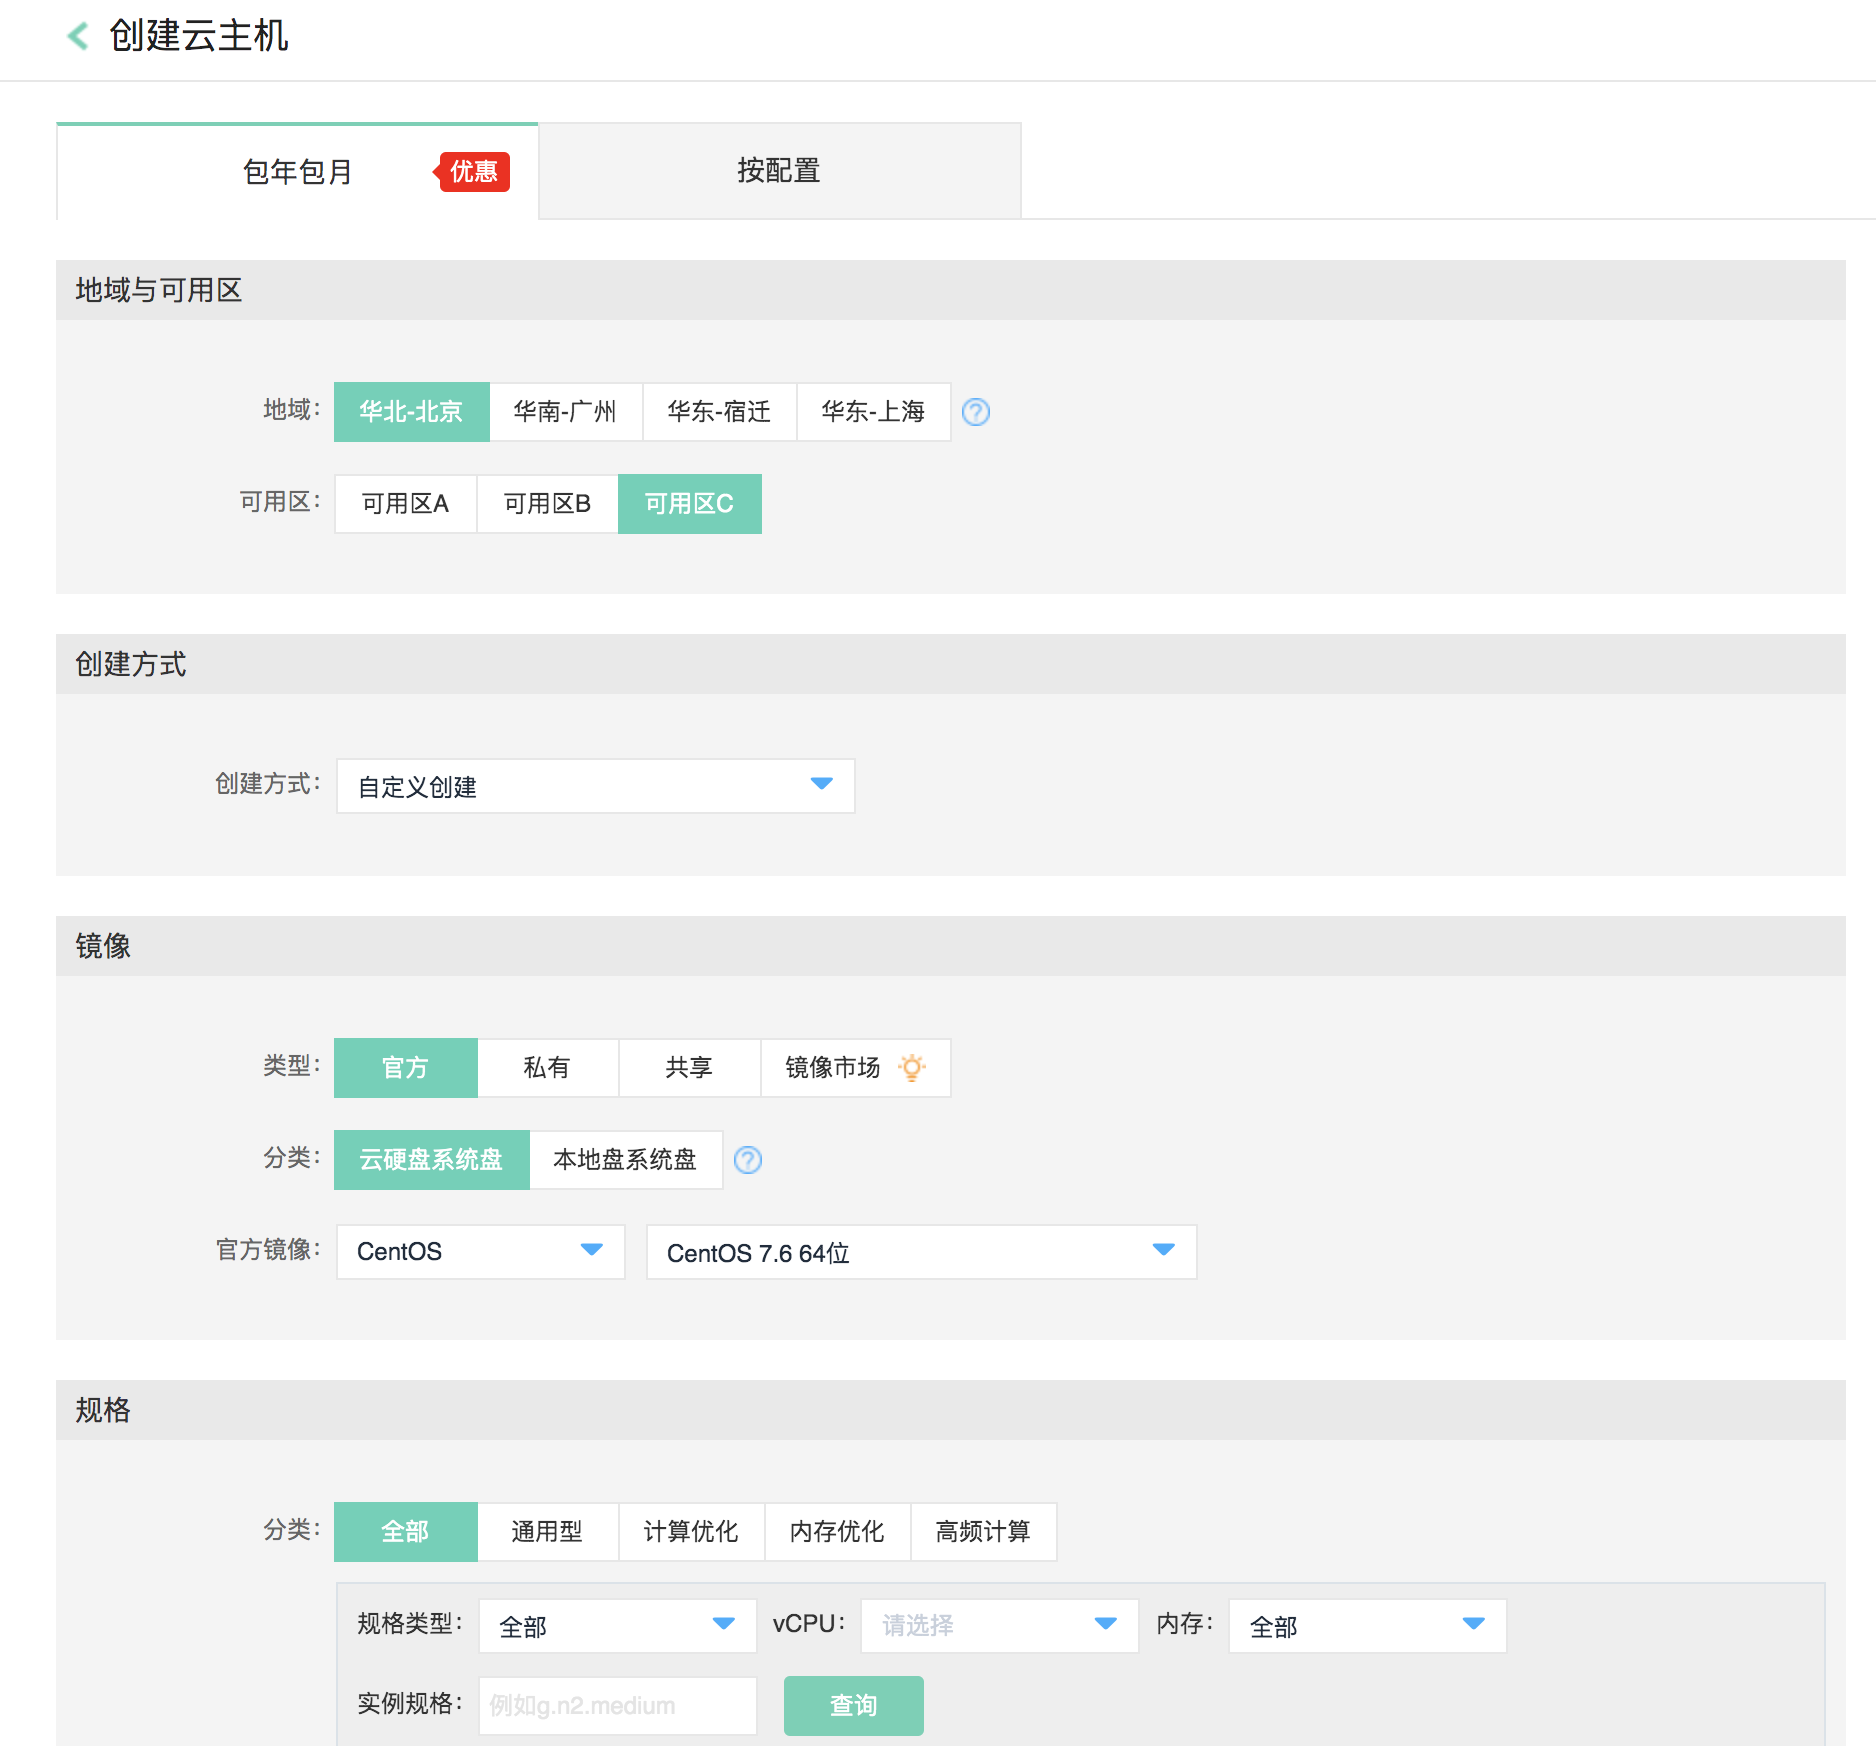
- 申请云主机
进入京东云的控制台,选择 “弹性计算” -> “实例” -> “华北北京” -> “创建”,并选择相应配置即可创建对应主机实例(rust-mirror-01):
- 安装 git 并创建仓库目录:
yum install git # 安装 git
mkdir /opt/git # 创建 git 仓库根目录
- 使用 https 拉取 github.com/rust-lang/crates.io-index.git 仓库:
cd /opt/git
git clone https://github.com/rust-lang/crates.io-index.git crates.io-index.git
-
修改 crates.io-index.git/config.json ,将 dl 参数修改为
https://rust-mirror.s3.cn-north-1.jdcloud-oss.com/api/v1/crates(对象存储rust-mirror空间访问地址), 保存并提交。 -
添加自动更新脚本 crates.io-index-sync.sh:
#!/bin/bash
cd /opt/git/crates.io-index.git && git fetch origin && git rebase origin/master
- 使用
crontab -e修改 crontab,设置为10分钟自动同步 GitHub 仓库:
*/10 * * * * /opt/git-config/crates.io-index-sync.sh
配置 git 协议公开访问权限
- 使用
git daemon暴露只读的/opt/git/rates.io-index.git仓库,使用方式如下:
yum install git-daemon
# 使用暴露 /opt/git 目录为只读权限
git daemon --base-path=/opt/git --export-all --reuseaddr --informative-errors --verbose
注意: git daemon 默认监听的端口为 9418,所以需要配置主机的 TCP 9418 防火墙入口规则:
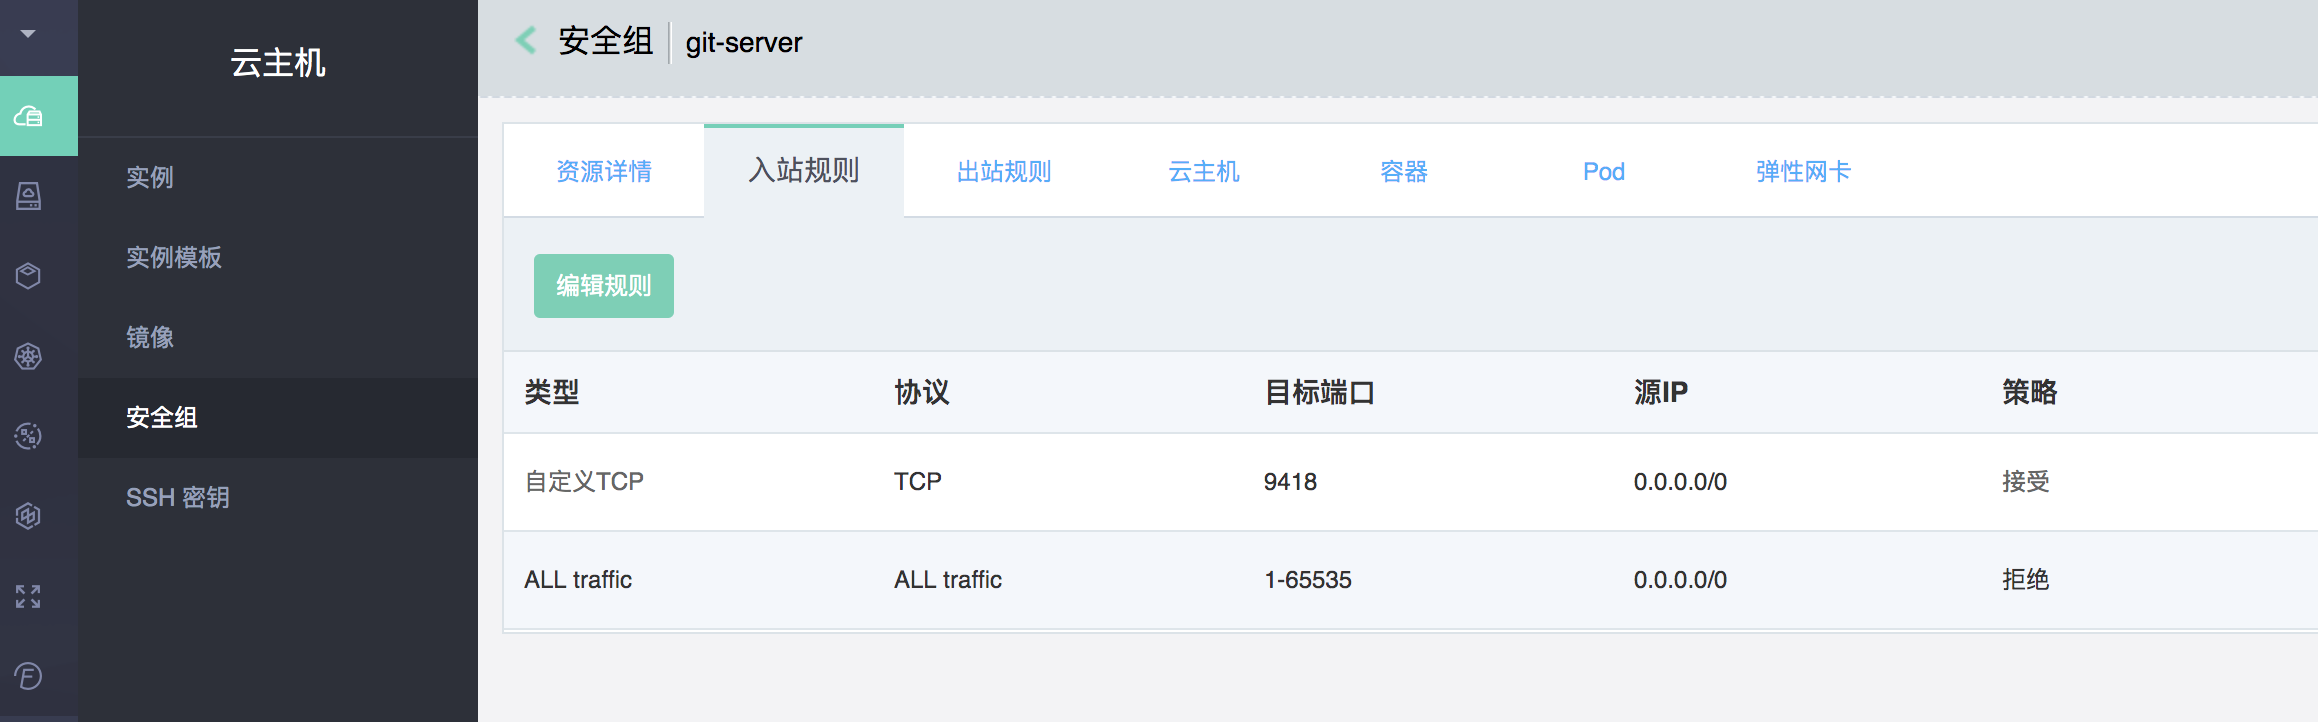
设置完成后我们就可以使用命令 git clone git://IP/crates.io-index.git 从我们服务器拉取 Rust 的最新镜像索引了。
- 设置开机启动项:
添加 /etc/init.d/rustgitdaemon 启动脚本,并添加执行权限。
#!/bin/bash

start() {
  echo starting
  git daemon --base-path=/opt/git --export-all --reuseaddr --informative-errors --verbose &
}
stop() {
  echo stoping
  pid=`ps -ef | grep "git daemon" | grep -v grep | awk '{print $2}'`
  kill $pid &
}
case "$1" in
start)
  start
  ;;
stop)
  stop
  ;;
*)
  echo "USAGE $0 {start|stop}"
  exit
esac
添加 rustgitdaemon 服务配置,新建一个叫 /usr/lib/systemd/system/rustgitdaemon.service 的文件,并添加如下内容:
[Unit]
Description=rustgitdaemon Service
After=network.target

[Service]
Type=forking
ExecStart=/etc/init.d/rustgitdaemon start
ExecStop=/etc/init.d/rustgitdaemon stop
PrivateTmp=true

[Install]
WantedBy=multi-user.target
保存并执行命令:
systemctl enable rustgitdaemon
systemctl start rustgitdaemon
配置 http 协议公开访问权限
这里主要使用 nginx + fcgi 的方案。
- 安装并启动 fcgi
# 安装 nginx 扩展,使其支持 cgi
cd /usr/local/src
git clone https://github.com/lighttpd/spawn-fcgi.git
cd spawn-fcgi && ./autogen.sh && ./configure && make && make install

# 安装fcgi
yum -y install fcgi-devel

# 安装fcgi的管理工具
cd /usr/local/src
git clone https://github.com/gnosek/fcgiwrap.git
cd fcgiwrap && autoreconf -i && ./configure && make && make install
配置 fcgi 启动脚本,新建文件 vi /etc/init.d/fcgiwrap,添加如下内容:
#! /bin/bash
### BEGIN INIT INFO
# Provides:          fcgiwrap
# Required-Start:    $remote_fs
# Required-Stop:     $remote_fs
# Should-Start:
# Should-Stop:
# Default-Start:     2 3 4 5
# Default-Stop:      0 1 6
# Short-Description: FastCGI wrapper
# Description:       Simple server for running CGI applications over FastCGI
### END INIT INFO

PATH=/usr/local/sbin:/usr/local/bin:/sbin:/bin:/usr/sbin:/usr/bin
SPAWN_FCGI="/usr/local/bin/spawn-fcgi"
DAEMON="/usr/local/sbin/fcgiwrap"
NAME="fcgiwrap"

PIDFILE="/var/run/$NAME.pid"

FCGI_SOCKET="/var/run/$NAME.socket"
FCGI_USER="nginx"
FCGI_GROUP="nginx"
FORK_NUM=5
SCRIPTNAME=/etc/init.d/$NAME

case "$1" in
    start)
        echo -n "Starting $NAME... "

        PID=`pidof $NAME`
        if [ ! -z "$PID" ]; then
            echo " $NAME already running"
            exit 1
        fi

        $SPAWN_FCGI -u $FCGI_USER -g $FCGI_GROUP -s $FCGI_SOCKET -P $PIDFILE -F $FORK_NUM -f $DAEMON

        if [ "$?" != 0 ]; then
            echo " failed"
            exit 1
        else
            echo " done"
        fi
    ;;

    stop)
        echo -n "Stoping $NAME... "

        PID=`pidof $NAME`
        if [ ! -z "$PID" ]; then
            kill `pidof $NAME`
            if [ "$?" != 0 ]; then
                echo " failed. re-quit"
                exit 1
            else
                rm -f $pid
                echo " done"
            fi
        else
            echo "$NAME is not running."
            exit 1
        fi
    ;;

    status)
        PID=`pidof $NAME`
        if [ ! -z "$PID" ]; then
            echo "$NAME (pid $PID) is running..."
        else
            echo "$NAME is stopped"
            exit 0
        fi
    ;;

    restart)
        $SCRIPTNAME stop
        sleep 1
        $SCRIPTNAME start
    ;;

    *)
        echo "Usage: $SCRIPTNAME {start|stop|restart|status}"
        exit 1
    ;;
esac
注意: 这里我使用 nginx 用户组启动 fcgi,因为接下来我们会在 nignx 中配合使用,不然会出现访问权限问题。
启动 fcgi:
chmod a+x /etc/init.d/fcgiwrap
chkconfig --level 35 fcgiwrap on
/etc/init.d/fcgiwrap start
- 安装、配置、启动 nginx
安装命令:
yum install nginx
配置 nginx, 新建文件 vi /etc/nginx/conf.d/rust-mirror.conf ,添加内容如下:
server {
    listen 80;
    server_name rust-mirror.jdcloud.com;
    client_max_body_size 100m;

    error_log  /var/log/nginx/rust-mirror.error.log  error;
    access_log /var/log/nginx/rust-mirror.access.log main;

    location ~ ^.*\.git/objects/([0-9a-f]+/[0-9a-f]+|pack/pack-[0-9a-f]+.(pack|idx))$ {
        root /opt/git;
    }

    location ~ /.*\.git/(HEAD|info/refs|objects/info/.*|git-(upload|receive)-pack)$ {
        root          /opt/git;
        fastcgi_pass  unix:/var/run/fcgiwrap.socket;
        fastcgi_connect_timeout 24h;
        fastcgi_read_timeout 24h;
        fastcgi_send_timeout 24h;
        fastcgi_param SCRIPT_FILENAME   /usr/local/git/libexec/git-core/git-http-backend;
        fastcgi_param PATH_INFO         $uri;
        fastcgi_param GIT_HTTP_EXPORT_ALL "";
        fastcgi_param GIT_PROJECT_ROOT  /opt/git;
        fastcgi_param REMOTE_USER $remote_user;
        include fastcgi_params;
    }
}
启动 nginx
systemctl enable nginx
systemctl start nginx
到这一步,我们就可以使用 http 协议来拉取我们的 git 仓库。
git server 的高可用
到目前为止,我们的 Rust 镜像已经搭建完毕,但此服务存在单点故障,因为我们的 git server 只有一个节点,那如何使我们的服务高可靠呢?
-
复制一个叫 rust-mirror-02 的节点,配置和启动服务完全和 rust-mirror-01 节点一样,并且两个节点属于同一个 VPC 子网。
-
创建一个分布式负载均衡,其后端服务配置为 rust-mirror-01 和 rust-mirror-02 的 git daemon (TCP:9418)。
使用说明
- 在 $HOME/.cargo/config 中添加如下内容:
[registry]
index = "https://github.com/rust-lang/crates.io-index"
replace-with = 'mirror-example'

[source.mirror-example]
registry = "git://rust-mirror.example.com/crates.io-index.git"
如果所处的环境中不允许使用 git 协议, 可以把上述地址改为
registry = "http://rust-mirror.example.com/crates.io-index.git"
注意: 本地通过配置 hosts 使 rust-mirror.example.com 指向负载均衡的入口地址。
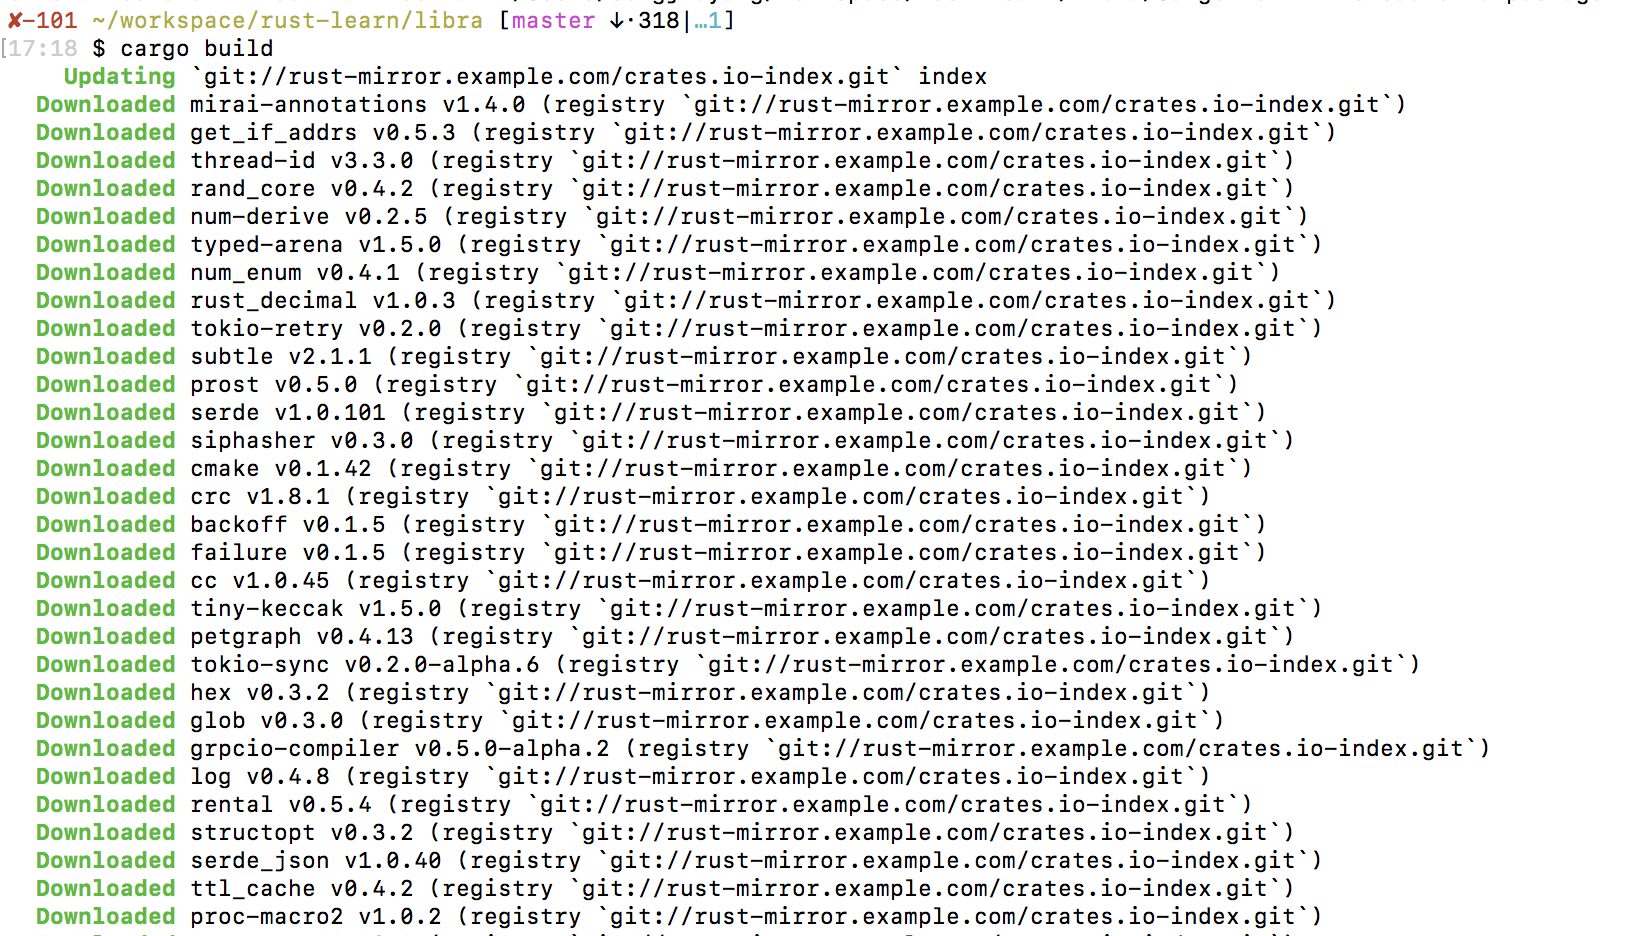
- 使用体验:
git clone git@github.com:libra/libra.git
cd libra
cargo build
可以看到如下输出:
总结:
因为有云才让我们搭建 Rust 国内镜像变得如此简单。
到目前为止,我们使用京东公有云的对象存储、云主机、负载均衡快速搭建了一个高可用的 Rust 国内镜像服务,欢迎大家前来体验。